 I love activities that are
versatile and free. I made the file organizer fine-motor activity out of a file organizer that was being thrown out at work and detergent or dishwasher soap plastic bottles.
I love activities that are
versatile and free. I made the file organizer fine-motor activity out of a file organizer that was being thrown out at work and detergent or dishwasher soap plastic bottles.
The video demonstrates
how I use heavy duty scissors to cut up plastic handles to create small shapes
that can be attached or removed from the file organizer. (I apologize that I haven’t thought up a good
name for these objects, yet….)
At the bottom of this post I share a few Amazon links to products used to make this activity. I make a few cents which you shop from my Amazon links.
Materials used to make this Activity
The file organizer shown in the video provides a vertical surface so that individuals strengthen arms while reaching and viewing materials directly in front of them as opposed to on the table.
Cut handles from detergent or dishwasher soap bottles. Explore the variety of colors, shapes of the handles. Some plastic is very easy to cut and others not so easy. In my opinion, the less expensive brands like Arm and Hammer are easier to cut than the pricier Tide bottles!
Attaching a small bag to the file organizer for storage is optional.
Heavy duty leather or other types of work scissors. Once you start cutting plastic, the scissors will gradually become too blunk to cut paper. I use my "plastics" scissors only for plastic or cardboard.

There are many therapeutic benefits to
this activity and here are just a few:
1)
The plastic is
vibrant and colorful and can be used for color matching or sorting on the file
organizer levels.
2)
The file
organizer creates a vertical plane activity that promotes visual attention,
reaching and upright posture
3)
The plastic
pieces can be cut into smaller or larger pieces. Use larger or smaller plastic
bottles to control your size options.
4)
Some individuals
will be best at removing the shapes. That’s easier than attaching them!
5)
The file
organizer can be rotated to explore the best position for the client to learn
how to attach or remove the shapes.
6)
When plastic gets
lost, simply cut up more bottles! No expensive pieces to replace!
7)
The individuals
need to stabilize with one hand while attaching or removing the pieces. For some
people that is a skill that needs to be worked on!
8)
The file
organizer may be placed on top of a box so that the client is reaching and
working on an upright posture.
9)
Movement can be
incorporated into the activity by setting up a box of plastic across the room
or on the floor so that the individual needs to walk across the room or move
high and low to retrieve materials.
10) It feels good to
slide the plastic pieces across the file organizer. Some individuals will focus
on the sensory aspects as they have fun touching, sliding and pulling the
materials.
Please
be sure that you keep small objects away from children or adults with
developmental disabilities who may put them in their mouth, creating a choking
hazard. By the way, parents may create this activity for their typically
developing preschool age children as they work on color matching and sorting
and manipulation skills.
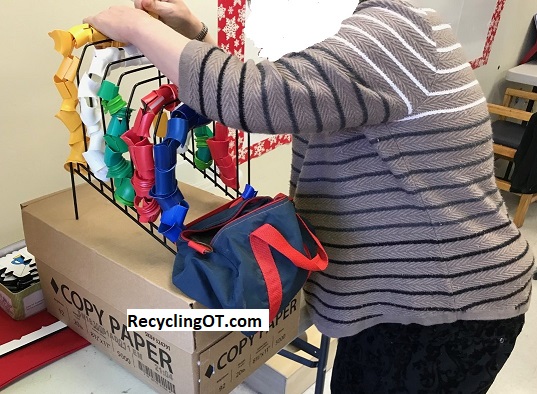
This cardboard box fit snuggly inside the file organizer. The box catches any pieces that fall during the process of pulling them off.
My client has cerebral palsy and enjoys reaching with either hand to remove and insert the shapes into the bag sitting to her right.
This reaching activity maintains upper extremity active range of motion .

I tried rotating the file organizer to better fit on the table. Then I noticed that the client was able to better perceive how the opening on the shapes nee
ded to be positioned in order to remove them from the stand.
Some children or adults may prefer to manipulate materials while on the floor, sitting at a table or standing. I raised the activity on top of the box so that she was not bending over and removed the box when she decided to sit in her chair.
Enjoy exploring the many ways that you can individualize this activity to the skill and interest level of your children or clients! I wish that I thought of this 25 years ago when my son was preschool age. He loved watching me create manipulation toys.
Try these file organizers.
Try these heavy-duty scissors:


 Cut a long, thin rectangle out of cardboard, plastic or a rug square. You just created a writing guide or window. Place the guide on top of various textures such as my mermaid pillow or bubble wrap to form lines . The bottom photo shows the silver line I "drew" using the guide!

 Its easy to draw and cut out a simple stencil from a
folder or other cardboard. Its so easy, I suggest making a new and different
one every day for children or adults with or without developmental
disabilities.
Its easy to draw and cut out a simple stencil from a
folder or other cardboard. Its so easy, I suggest making a new and different
one every day for children or adults with or without developmental
disabilities.
 I love activities that are
versatile and free. I made the file organizer fine-motor activity out of a file organizer that was being thrown out at work and detergent or dishwasher soap plastic bottles.
I love activities that are
versatile and free. I made the file organizer fine-motor activity out of a file organizer that was being thrown out at work and detergent or dishwasher soap plastic bottles. 

 I tried rotating the file organizer to better fit on the table. Then I noticed that the client was able to better perceive how the opening on the shapes needed to be positioned in order to remove them from the stand.


